![]()
| Webby 2.5 Documentation Webby, Manic Design's online web editor, makes it easy to manage your web site without the need for special software. The Webby web editor is intended for those at the beginner and intermediate levels. Advanced users will probably be more interested in FTP . Uploading files to your web site 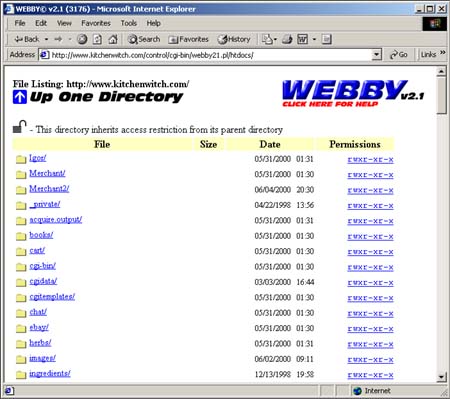
This feature requires Netscape Navigator 2.x or higher, or Internet Explorer 4.x. Under the "Send file(s)" section of the File Listing tool, fill in up to 5 files to be uploaded to your web site. Then press the "Send These Files" button. The files will be uploaded to your website, and you will see an up-to-date directory listing. Viewing/Editing files on your web site To view files on your web site, locate and click on the file using the File Listing tool. The file will be displayed. Certain file types (HTML, text, etc.) can be edited online. A text box will appear and allow you to make changes to the file. Simply press "Update This File" once you are done making changes. Creating new files on your web site To create a new (blank) file on your web site, simply type the name of the new file into the "New file" box under the File Listing tool. Then press "Create File" to create the file. The file will appear under your directory listing; you can then edit the file normally. Creating directories on your web site To create a new (empty) directory on your web site, simply type in the name of the new directory into the "New directory" box under the File Listing tool. Then press "Create Directory" to create the directory. Renaming files on your web site To rename a file, simply locate and click on the file using the File Listing tool. Enter the new name, and press "Rename This File". Deleting files from your web site To delete files from your web site, locate and click on the file using the File Listing tool. Then press "Delete This File". The file will be deleted from your website, and you will see an up-to-date directory listing. Copying and moving files on your web site 
To copy a file to another location on your website, locate and click on the file using the File Listing tool. Then press "Copy This File". A destination box will appear; select the appropriate destination; then press "Copy To" to copy the file. To move a file to another location on your website, locate and click on the file using the File Listing tool. Then press "Move This File". A destination box will appear; select the appropriate destination; then press "Move To" to move the file. Changing file permissions (advanced) The permissions of a file affect
if/how other users can access your files. To change the permissions
of a file, simply click on the file's entry in the permissions column
(i.e. Using access restriction (password-protection)
Webby allows you to password-protect and IP-protect certain directories. To restrict access to a certain directory, enter that directory and click the "lock" icon at the top of the screen. Choose one of the following access restriction types: FrontPage users must use the Microsoft FrontPage Explorer in order to manage access restriction; Webby can not manage access restriction for FrontPage users. You must have Javascript enabled in order to use this feature. Webby manipulates .htaccess files. If you have manually edited .htaccess files in your directory, they will not be compatible with Webby, and must remove manually-edited .htaccess files before using Webby's access restriction system. More on users and groups
Password protection is the most common type of access restriction. Follow these steps in order to create a list of usernames and passwords which are allowed to access a certain directory: You can add and remove users, and change passwords at any time by choosing "Manage users and groups" and editing the appropriate group. Access-restriction en masse (in bulk)
To do so, create a group normally, then click "upload users en masse". You will be prompted for a comma-delimited file, where column 1 contains the usernames, and column 2 contains the passwords. For more information, see the instructions found on the "upload en masse" page. |